|
|
We have this great vintage trailer in very original condition and it even still has the original mint green Formica laminate on the
kitchen counter and dining table. Unfortunately, previous owners have bored several large holes in the Formica covered countertop.
We plan to install new reproduction faucets and eventually a reproduction hand pump using some of these holes, but we'll still be left
with several unsightly holes in the Formica. We could replace the old Formica but this awesome mid-century mint green laminate with gold specks
pattern
|
was discontinued decades ago so it's very unlikely that we could find replacement sheets of laminate in this original pattern. Or we could
choose one of the new "retro" patterns offered by WilsonArt, Formica and others
(for tips on where to find retro pattern/style laminate,
Click Here) and install all new laminate,
but we would prefer to
keep the trailer "stock" and try to retain the original Formica countertop. Finally, after some experimentation, we came up with a process that we could
use to keep our Formica countertop in place, and just patch the holes. The results aren't perfect, but they're good enough.
So if you have a mid-century home or vintage trailer with a damaged plastic laminate countertop, follow the diy
steps outlined below, and learn how you can patch your vintage Formica, instead of replacing it.
1. Fig.1 (and the image above) show our
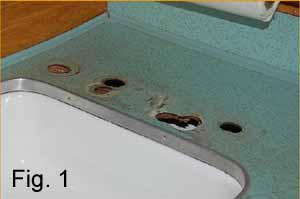
original Formica countertop with 6 large holes that have been drilled through the laminate
and 3/4 inch plywood underlayerment, by previous owners. What a mess! First we need to scrub the Formica clean and then test fit our new faucets and
hand pump in each hole, to see which holes we can use and which we'll need to patch. Fortunately the holes to be patched are mostly behind the
faucets and will be shadowed by the paper towel roll, so our patches shouldn't be too noticeable.
2. Fig. 2 shows the results of several steps.
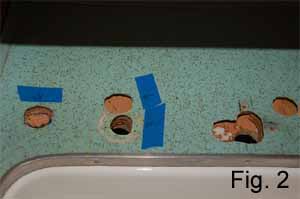
We've cleaned the stains off the Formica and used blue masking tape to temporarily mark which holes we'll be preserving and which need to be patched. Then we cut out a piece of
3/4" plywood that we'll attach underneath the countertop to block off the holes that need to be patched. For our project, we wanted to use a single piece
of plywood (about 3" wide and 14" long) to cover all of the holes to be patched. We also had to bore 2 large holes in this backing-board
so we didn't cover up the holes we'll be using for our new faucets. Hopefully your project will be simpler. The backing-board was attached to the
underside of the countertop with Gorilla Glue and several drywall screws of the appropriate length.
3. We'll be filling the holes-to-be-patched, with epoxy filler (we use U-POL's "Fly Weight" epoxy filler
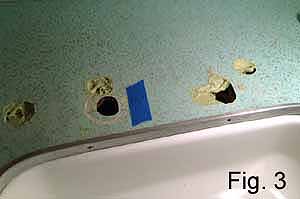
because it's lighter and less likely to absorb moisture, but any other epoxy filler, e.g., "Bondo", should work fine). In our case, the holes are large so we'll be
filling them with several layers of epoxy, instead of a single 3/4" thick layer. After each layer hardens, we'll mix up another batch of epoxy and fill each hole with
another layer. For the final layer use a putty knife to carefully smooth the filler so it's even with (or slightly below) the surface of the Formica.
Then before this top layer of epoxy has completely hardened, use a not-too-sharp wood chisel and rest part of it on the Formica surrounding the hole and carefully
shave off any high-spots of filler as you work around the edge of the hole (this is instead of sanding the hardened filler which would scratch up the Formica around the hole).
Then use a paper towel dampened with lacquer thinner to lightly wipe off any epoxy filler that accidently got smeared on the Formica.
In Fig. 3 you can see that we still need to spread the final layer of epoxy in each hole to bring each patch up flush with the surface of the Formica.
4. In Fig. 4 you can see that we've chiseled off the
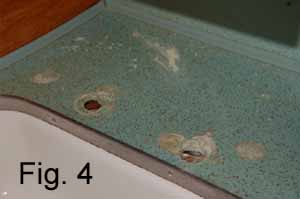
high spots in each patched hole (these shaved areas are a lighter green). The areas of
darker green in each patch are the "low" spots. So next we'll mix up another small batch of epoxy filler and use a putty knife to spread a leveling layer of
filler on each patch, using the edges of the hole as a guide. The epoxy will shrink slightly as it hardens. So you'll probably have to spread on a leveling layer of epoxy, let it harden a little, use the chisel to
carefully shave it smooth and level with the laminate surface, several times before the patch is smooth and level. Be patient and take your time.
5. At this point, we're almost done leveling the
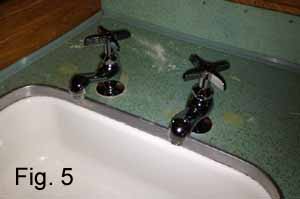
patched holes with epoxy filler. In Fig. 5 we're test fitting the new faucets and
you can see that the patches are looking good and are already less noticeable (check Fig. 1 above to see how far we've come!). Fortunately, the base flange around each faucet
covers part of the epoxy patch. Of course, it also
helps that the "Fly Weight" epoxy filler is colored green like our vintage Formica, but this was just a lucky coincidence.
6. Fig. 6 shows our Formica patches after we lightly
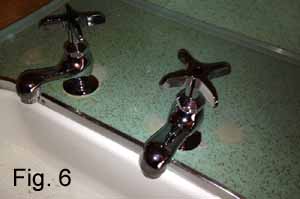
sanded them with 220 grit sandpaper. This final step must be performed very carefully. Tear off a small piece of sandpaper (like 1" by 2") and wrap it
around a short length of 3/4" by 3/4" scrap wood to make a small "sanding block". Sand slowly and carefully so you don't accidently sand
the laminate edges surrounding the patches. After all of the epoxy filler layers and smooth shaving with a chisel, you won't need to sand much.
Just gently sand the filler patches until they are flat and smooth.
7. Fig. 7 is a close-up view of the finished Formica
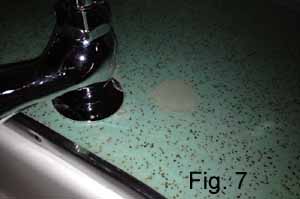
patches. At this point we're basically done with the "fill" steps of patching the laminate countertop. The bare epoxy patches are a plain gray green color that
doesn't yet blend in with the surrounding mint colored vintage Formica, but we'll be correcting that soon.
8. In this step we paint the epoxy patches to match the color of our laminate countertop. Sounds straightforward
but it requires a steady hand and a little luck in finding the right paint color.
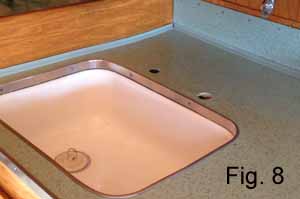
You're going to have to get a custom color mixed. You can use automotive paint but it may be difficult to find someone to do an accurate match.
We went with a high-quality latex paint because it's easier to find a broad array of colors and it's cheaper to get a quart of latex mixed than it is
to get a quart (or pint?) of automotive paint mixed. We headed down to the paint store and grabbed a dozen paint chip cards we thought might be close to the
shade of our mint green vintage Formica. We then held each chip next to our Formica and picked the one that was the closest match. It wasn't perfect, so we
went back to the paint store and grabbed several more chips that had a little more green in them. We went back-and-forth several times,
but eventually we found the closest match and had the store mix up a quart of gloss latex in that shade. We also bought a small, soft artist paint brush. Next
we dusted off the countertop and lightly wiped off the patches with a paper towel dampened with lacquer thinner and then waited for the lacquer thinner to dry.
They using the small "touch-up" brush we bought, we carefully covered each epoxy patch with the custom latex paint (brushing slightly onto the
Formica edge around each patch). We applied one light coat and then came back the next day and brushed on a final coat.
9. Fig. 9 shows the completed patched Formica project.
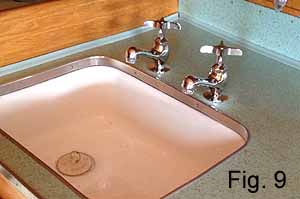
We painted each patch with the custom mixed latex paint.
Then for the final "camouflage" step we bought a small bottle of Testor's "Gold" paint and a very tiny artist's brush and carefully brushed on some random
"streaks" and "dots" to match the pattern on our vintage Formica. Don't over-do this step, remember that "less is more" and you can always come back and add a few more
"spots" as necessary. Some things to keep in mind; when painting with latex paint remember that the shade will get darker as the paint dries and won't match the chip
until it's completely dry; also remember that however
durable the latex paint is, you still need to be careful when cleaning the counter top so the paint patches don't get chipped or scratched. From a durability standpoint,
automotive paint is probably a better choice than latex paint, but we're happy with the solution we chose. Also note that we selected GLOSS latex because
our laminate countertop has a glossy finish. If you have a less-shiny countertop, then an eggshell or semi-gloss paint is probably a better choice.
With the new faucets installed, our kitchen countertop looks great now and it still has the "original" look we wanted.