|
|
We've put up with the old, rusty license plate lamp and mangled license plate bracket on our vintage trailer long enough.
It's probably the original unit, but it's seen better
days and shouldn't be too difficult to restore. The steps below will show you how to restore the license lamp
and license plate bracket on your vintage trailer. With a few hours of work and a few new parts you can restore your vintage trailer's rusty crusty old
license lamp housing and license plate bracket to show condition.
|
1. Fig.1 (and the image above) show our original Bargman license lamp housing and license plate bracket. These housings are pot metal so they're
very difficult to re-chrome. Looks like restoration and a re-paint will be the solution. Like most vintage
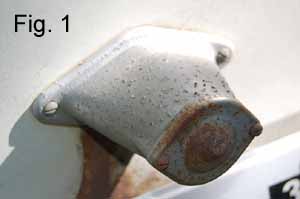
trailers, our trailer's housing is heavily corroded and pitted and the end cap is tired, rusty and dented. First, remove the housing from the trailer
by removing the two screws and then twist off the wire nut inside to free the housing from the trailer. Next remove the end cap and carefully slide out
the thin glass cylinder behind the cap. Next use a fine flat file to carefully file around the housing and remove the ridges sticking up around the edges
of the scratches and pits, until the surface is smooth. Finally, us a piece of 150 grit sandpaper to hand sand the entire license light housing
so the surface is smooth and even.
2. Now mix up a small batch of epoxy filler
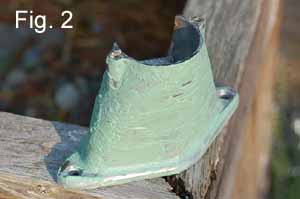
("Bondo" works, but we use "Fly Weight Gold" by U-POL because it's lighter and
less likely to absorb moisture). For this first batch just mix up a 1" wide dab and use a putty knife (and a finger, if necessary; use lacquer thinner
to clean the epoxy off your fingers!) to smear epoxy over the areas of the housing that are scratched or pocked and pitted.
The goal here is to use as little epoxy as is necessary, but to completely fill all of the pits and craters (see Fig. 2).
Any un-necessary blobs or smudges of epoxy will just have to be sanded off later.
3. After the epoxy has completely dried, it's time to do some sanding. In Fig. 3 you can see that we've already done some hand sanding
with 150 grit sandpaper. Work slowly and carefully. The goal is to sand off the extra streaks of epoxy filler
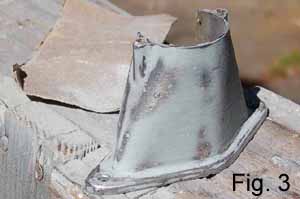
while taking care to not sand away the epoxy filling each pit in the pot metal. After sanding the entire outside of the housing, you may notice some
pits and craters that didn't get adequately filled; if so, mix up another small batch of epoxy filler and refill/coat those areas. Keep filling and sanding
until the surface is smooth and even. Remember that any scratches, bumps or depressions in the sanded surface will show in the final coats of paint.
When you're happy with the results, do a final "finish" sanding with a piece of 220 grit sandpaper.
4. The housing is looking a lot better now, and it's time to prepare for the priming and paint steps. First, use small pieces of blue
or green painter's tape (not the old beige hardware store stuff) to carefully mask off the inside of the housing where the
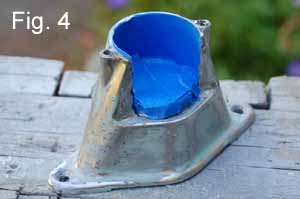
bulb socket resides and the smooth curved surface the thin glass housing slides into. We don't want to get any primer or paint on these surfaces.
Finally, use a paper towel dampened with lacquer thinner, to wipe down the entire outside surface of the license lamp housing to remove dust and your
oily finger prints. Work quickly and lightly and don't use too much lacquer thinner because it can soften the epoxy filler and ruin your carefully filled divots.
Now we're ready for the priming step, which will involve spraying the pot metal housing with primer (use an aerosol can since this is such a small job).
5. If you spray on a single heavy coat of primer, you'll
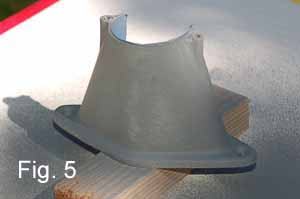
end up with runs and sags of wet primer - not good. Instead, apply several light coats. In Fig. 5 you can see that the first coat of primer is very thin
and just barely hides the epoxy filler patches. This first coat will dry quickly and probably be ready for another coat in 10 minutes.
Note that we're spraying primer (and paint) outside so we have plenty of ventilation to minimize the effects of breathing in the fumes
(choose a warm, non-windy day and make sure your overspray won't land on anything important (like your house, car or vintage trailer!).
6. In Fig. 6 we've finished spraying the final coat of
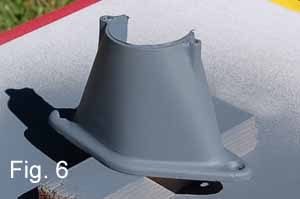
primer. This coat is heavier than the first and should completely change the housing to the color of the primer, with no signs of the epoxy
"pit patches" showing through. If you can still see faint "ghosts spots" where the epoxy patches are, let this coat of primer thoroughly dry
and then sparingly spray on another coat of primer. After the primer coats are completely dry (this could take as long as 30 minutes),
lightly hand sand the primer with a piece of 220 grit sandpaper to smooth away the "orange peel" texture of the primer.
7. After lightly sanding the primer, gently wipe down the surface with a paper towel in preparation for
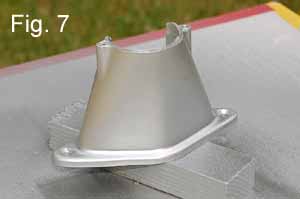
the final color coats. In Fig. 7 you can see we used an aerosol can of Krylon's Dull Aluminum (Krylon color #1403) paint to put the final finish on our vintage trailer's
license plate lamp housing. As usual, we sprayed on 3 coats, instead of just one heavy coat, to avoid sags and runs. The first coat should be an even
covering but barely cover the primer. The final coat is heavier and applied just to the point where the paint looks wet - then stop spraying in order to avoid runs.
Obviously you can use any color you want, but we think this "Dull Aluminum" color looks closest to the original finish. Just make sure that
the primer and finish color paint you choose are both enamel-based or both lacquer-based.
8. Ok, in Fig. 8 we've finished our restoration project, re-attached the bulb socket wire in the back
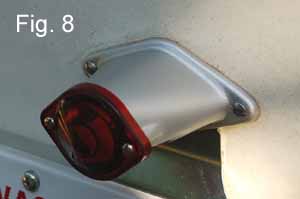
to the wire coming out of the trailer and attached the license plate light housing assembly back onto our vintage trailer. Note that we've used new
stainless steel oval headed screws to attach the housing. Also note that instead of restoring the end cap,
like we did the housing, we decided to replace the end cap with a new red plastic "license plate light lens". This new plastic lens
(known as Trail-Lite #4 or Bargman No.4) is available from several vintage trailer parts vendors and comes with a new gray silicone gasket
and appropriate stainless steel screws (don't over-tighten these or you may crack the lens) to attach it to the license lamp housing.
In our humble opinion, it dresses up the rear end of a vintage trailer and adds a great "vintage look".
9. Fig. 9 shows the results of our work. The license
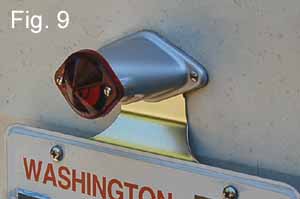
plate lamp housing on our vintage trailer looks great now. Compare it to the images at the top this page - what a difference! Note that while the license
lamp housing was off our vintage trailer, we decided to also replace the old license plate bracket (again, look at the top image - uggh).
This new license plate bracket is cadmium plated and available from the usual vintage trailer parts vendors. We could have straightened and re-painted the
old bracket but this new one looks great, saved us a lot of time, and really compliments our newly restored license plate light housing!